
Are you planning to run electric power to an outbuilding like a shed, pond, garage, workshop, lamp post, or outdoor Christmas tree? The good news is that you can do it yourself if you have the necessary wiring skills and, of course, the tools. Although similar to adding an indoor circuit, you need to install an underground electrical conduit from the main circuit panel to the outdoor space.
Understanding the National Electrical Code in your locality is essential for safety and adherence to regulatory frameworks. You can visit the National Fire Protection Association website to get the electrical standards for your state.
Although our step-by-step guide will help you save over $10,000 to run a 500-feet conduit, most people prefer hiring experts because of the potential fatal shock from the main service panel. If you need licensed professionals, we are just a call away and ready to help install the underground electrical conduit.
In this blog post, we will go through:
Depths of Underground Wiring
How deep should I bury the conduit? This is a common question in DIY electrical conduit installation. The primary determinant of the depth of the conduit trench is the type of wire you are using. That said, let’s get into details of when you should use 6, 12, 18, or 24-inch depth.
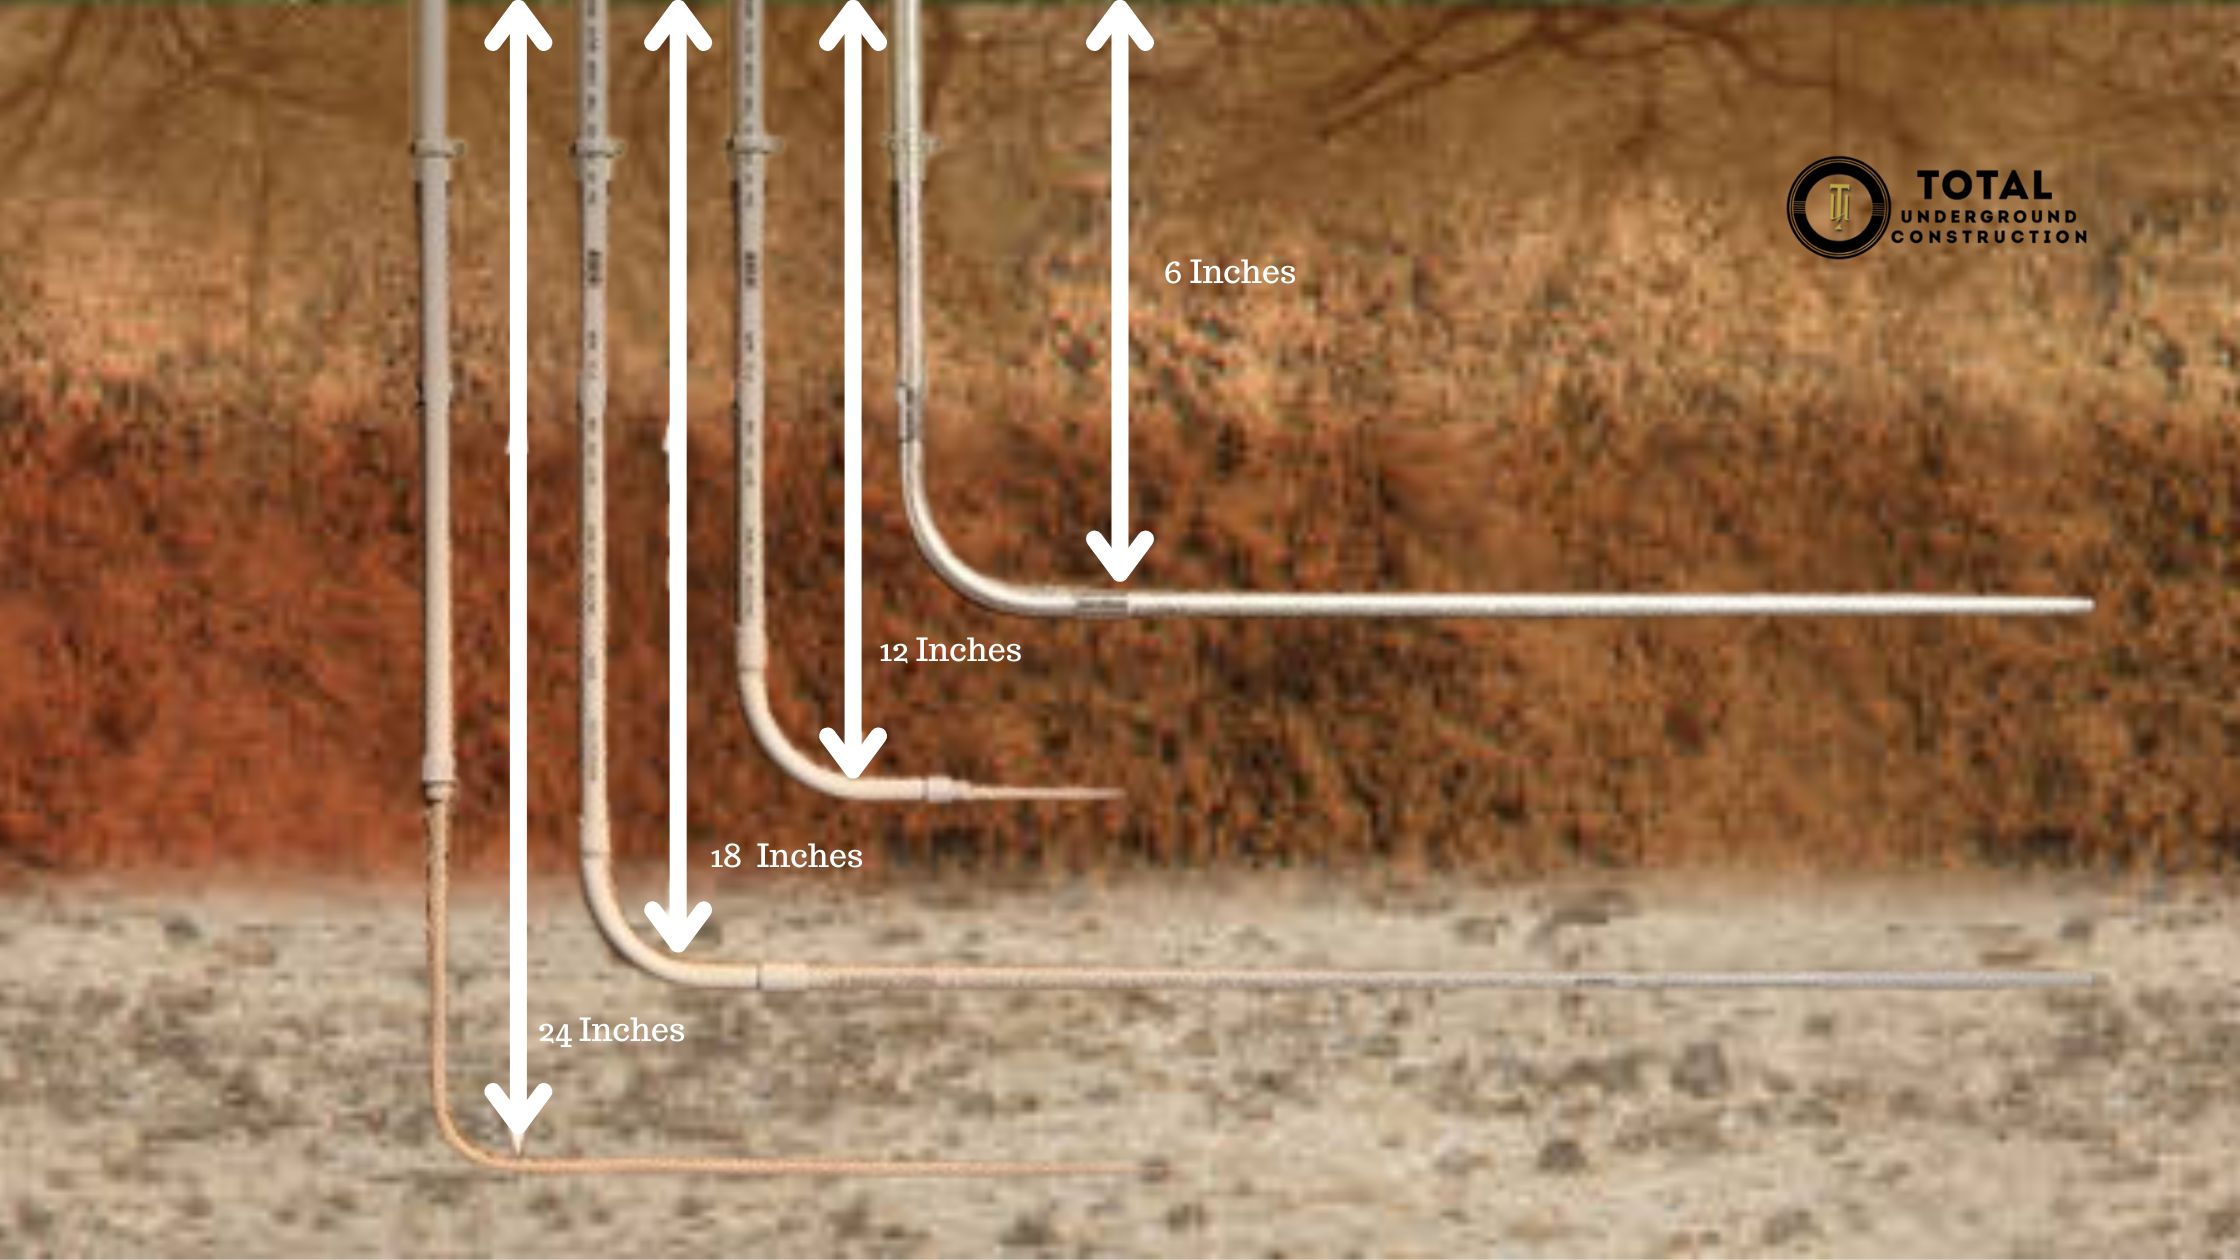
6-Inch Depth Option
Rigid metal conduit can withstand digging or other significant impacts that can cause shorting. So, this informs the shallow digging required when using galvanized EMT (metal electrical conduit).
It is advisable to use a thick-walled conduit at least 3/4 inch to avoid potential damage and ensure proper protection for the wires. The wires you are using should have a “W” labeling (wet-location rating), such as Type THWN-2 (thermoplastic/wet location/nylon jacket).
12-Inches Depth Option
When using the direct burial method and GFCI-protected Type UF cable, the depth of the trench should be a foot. GFCI protection acts as an electrical safety enhancer, reducing the depth required.
To provide the necessary safety, add a PVC pipe where the cable emerges from the trench, ensuring further protection against moisture and physical damage. The socket is limited to 120V, and the socket breaker should be 20 amperes or less. So, this method and depth are mostly ideal for small backyard electrical projects, like lamp posts.
18-Inches Depth Option
You can use thermoplastic high heat-resistant nylon-coated (THHN) wire and PVC conduit at this depth. The PVC protects the cables from the impact of digging, while the rating shows the cable is water-resistant.
The flexibility of this underground electrical conduit installation makes it ideal for most outbuilding projects. You can add extra wires through the PVC pipes to another outlet or a switch loop to control the lights from your house.
24-Inches Depth Option
At two feet deep, you need to hire a trencher, and the soil should be easy to dig. Because the cables are directly buried in the ground, you need UF cables. Where the cable emerges from the ground, it needs protection with schedule 80 PVC conduit. This method is uncommon because adding extra wires can be difficult, and fixing issues takes more time and resources.
Tip 💡: Consult an electrician before trenching to understand the ideal depth and method of installing the underground electrical conduit.
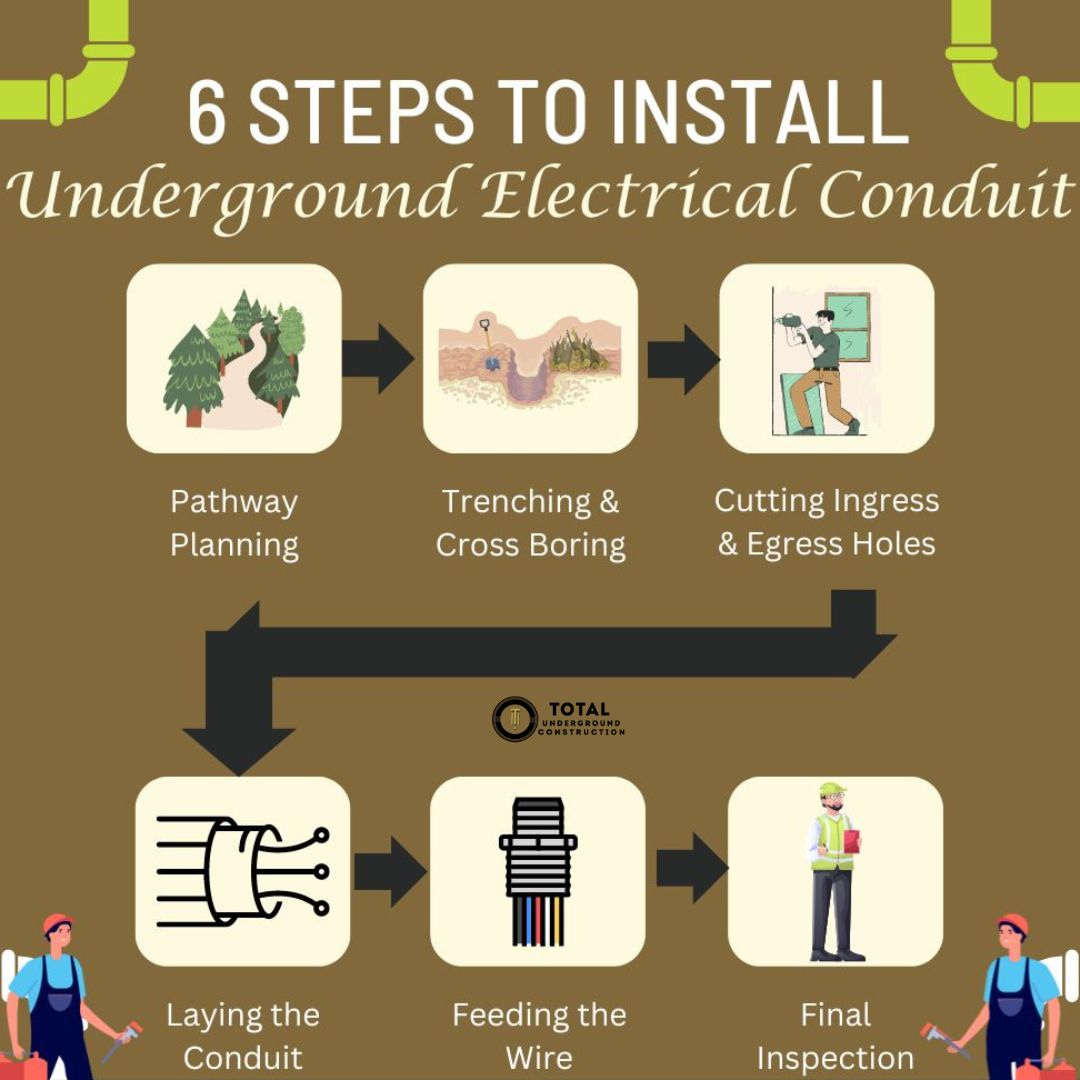
Step-by-Step Guide to Run Underground Electrical Conduit
Tools Required:
- Reciprocating/Hack saw/Pipe cutter: Cutting the pipes to size
- Tapping hammer: Aligning the conduit with the trench and ensuring firm connection between the pipes
- Tape measure: Taking measurements of the pipes and the conduit pathway
- Shovel: Digging and removing soil from the trench
- wet-cutting concrete saw: cutting holes through the walls
Depending on the size of the project and depth of digging, you can consider hiring a trencher. The cost is around $100-$200 per day, and you can get the equipment from local hardware stores or equipment rental companies.
Materials Required:
- Conduit pipes
- Conduit clips
- Construction adhesive
- Clear caulk
- Bell-end adapters
- PVC cement
- Conduit Glue
Step 1: Pathway Planning
Calling 811 to mark all the utilities along your conduit pathway will prevent damage to water lines, the main power line, telephone cables, and the gas supply system. After the utility lines are marked, notify your neighbors if you will block their driveways.
Partial trenching can minimize disruptions and ensure the safety of all involved. Mark out the path of the conduit while minimizing bends—the shortest and most direct route is the best.
You should also call the local building inspection department to know whether you need any permits before starting the work.
Step 2: Trenching and Cross Boring

Renting a trencher is advisable if running the electrical conduit for a long distance and depth. Although you can use digging shovels, it will take a good amount of your time, saving a hundred or two hundred dollars.
Where utility lines intersect, you should consider using shovels to avoid tampering with other services. If you have to cross sidewalks, you can dig on both sides of the pathway and use a rigid metal to bore a lateral hole beneath it.
Step 3: Cutting Ingress and Egress Holes
Next, cut ingress and egress holes along the chalk lines using a wet-cutting concrete saw. Consider a PVC conduit outlet body before driving the cables to the outbuilding’s interior. This is a necessary hack to avoid unnecessary bends when running the wire and future additions.
Step 4: Laying the Conduit
First, lay the conduit along the trench before cutting or gluing any PVC. After that, use PVC cement and conduit glue to connect the pipes. Some local regulators require bell-end adapters between the joints to create a smooth connection and avoid damage to the electrical cables.
Use sweep or bend fittings and conduit clips to ensure a smooth transition from horizontal to vertical directions on both ends of the conduit. This helps maintain a consistent flow and prevents potential kinks or obstructions in the conduit system.
Step 5: Feeding the Wire
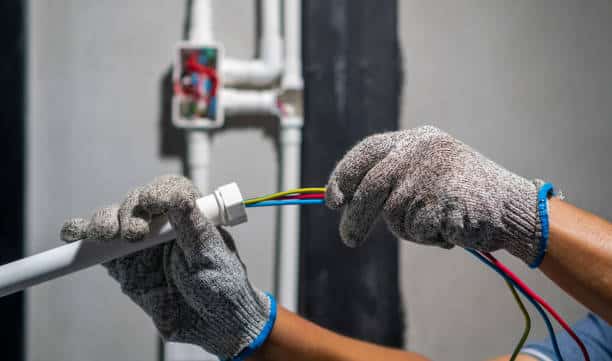
If the distance is short and has no bends, you can push the electrical wire through the conduit pipe.
The other option is using fish tape to run the wire through the conduit. In this case, you tie one end of the UF cable or THWN wires to the fish tape and pull it through the conduit. You can apply a lubricant to ease the movement of the cable through the conduit.
Tip 🎯: Consider pulling in a spare string or two when feeding the wire to save your effort in the future. Apart from that, you should leave excess cable on both ends for easier connection with the building’s main service panel and distribution.
Step 6: Final Inspection
Before burying the conduit, it is advisable to have an inspector confirm that the system meets the local electrical codes. This is a necessary step for your safety and compliance with local standards.
Ensure all the plates on your conduit outlet bodies are well-secured. Lastly, fill in the trench after the conduit has ticked all the boxes.
Tip 💡: Outbuildings must incorporate ground fault protection across all circuits. Ensure the metal building enclosure is bonded to the incoming electrical bare or green grounding conductor as per Article 250 of the National Electrical Code. If necessary, install a grounding electrode. Additionally, all junction boxes should be housed in water-resistant covers with sealed openings.
Conclusion
Installing an underground electrical conduit can be a good DIY project if you have the tools and skills required. However, if you are looking for a professional company to help with underground trenching and conduit running, Next Level Plumbing Services is your go-to company.
Over the years, we have helped commercial and residential properties create seamless connections from the main panel to garages, sheds, and other outbuildings. Get in touch with us for a tailored solution.